


27th August '22 | Postcards by Fabienne
First time hiking in glacier terrain

Hei there!
And here it goes, another Arctic week in the books. Every day there is something new to explore, learn, process, and experience, and it feels strange that it was only a week ago that I shared with you my visit to the dog yard. Right now, I am sitting in my favourite Huskies café. I was one thought of going to try out the second café in town – but my feet just went in another direction. But I will try to write next week’s newsletter from the other one 😉
I mainly want to share some pictures with you, but let me first tell you a bit about this week:
Monday: We had Monday morning off (nice one, I know). Afterwards, we continued a lecture we didn’t finish on Friday since everyone agreed we were way too tired (yes, things work a bit differently here 😊). Then we started our group work project.
Tuesday: We spent the whole day working on our group project. It is an accident investigation report about an actual maritime incident where a tourist got hit by crashing glacier ice – and died. In the afternoon/evening, I joined some other students flying a drone in Nybyen (“New City”), which is another part of Longyearbyen and lies behind the city (I mean, first Fjord, then Longyearbyen, then Nybyen, then glaciers). Until last year, students were living in Nybyen and had to walk 2.5 km in one direction to university each day!
Wednesday: We continued and finished the first version of our investigation report. In the afternoon, I met Ellis (you might remember her from my flight to Longyearbyen) for coffee. It was super lovely to see her again!
Thursday: We had a lecture about the actual risk assessment and planning steps undertaken before excursions or fieldwork at UNIS – and used the hike for the next day as a planning example. Afterwards, we picked up all equipment we would need (such as rifles, flare guns, crampons, first aid kit, GPS, etc.). Later, I joined Ellis in her car to do some wildlife photography together. We did not spot any foxes, but we found geese and a reindeer! Ellis has a 500mm lens (mine only goes up to ~240mm). I am looking forward to her picture!
Pictures: Left: Barnacle geese. Right: Svalbard reindeer.

Friday: We went on our first field trip to the glaciers behind Longyearbyen and looked at the different hazards we previously learned about.
Saturday + Sunday: Kayak course in the fjord (yes, kayaking at 2°C) 😊
Okay, now let me share some pictures from my first time in glacier terrain – our hike/field trip on Friday. The tour looked like this: We started from Nybyen, hiked up the side of the glacier “Larsbreen”, hiked onto the plateau of “Sarkofagen”, descended on the other side and then hiked back on the glacier.
Picture: Toposvalbard map of the trip.

If you are interested in the topography of Svalbard, TopoSvalbard is an excellent website tool which all locals use for tour planning. The best Scandinavian weather app is called “yr” (or yr.no).
This was one of the steepest parts at the beginning of our trip to the Larsbreen glacier. Our teacher told us that only a few years ago, the glacier was reaching way forward, and the collapse of the hillsides just happened in the last two years. He also assumes that the same track will not be accessible anymore in the coming years.
Pictures: Hiking towards Larsbreen glacier through a landscape shaped by recent landslides, mudslides and rockfalls.

Pictures: Larsbreen glacier.

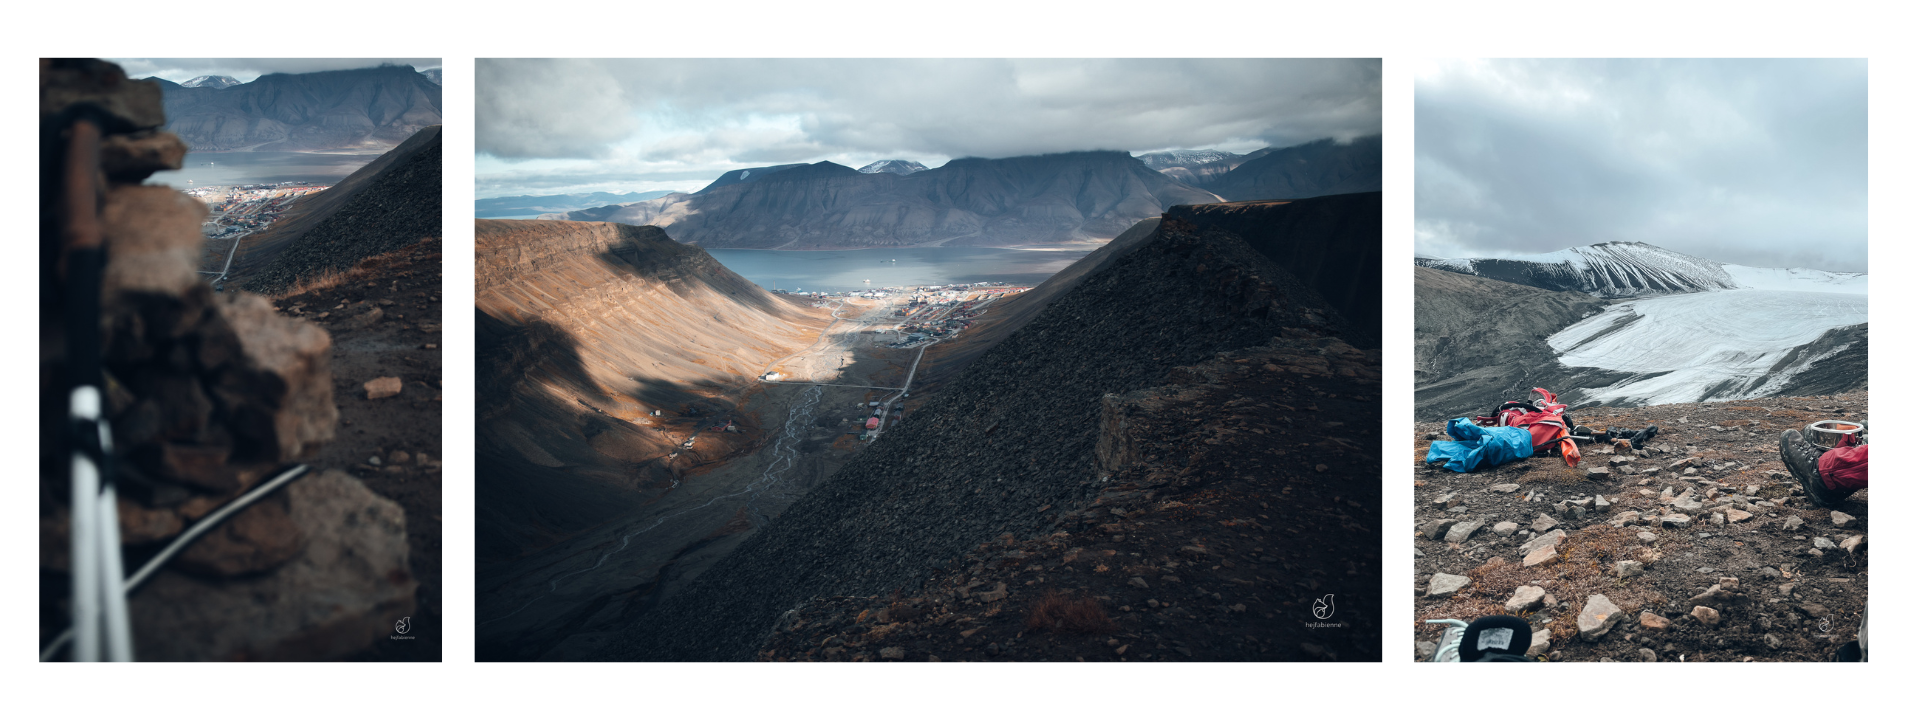
We had our lunch break on the top of Sarkofagen, allowing a stunning view across Longyearbyen and the fjord. You can also spot in the picture that the city is located in a river valley – another natural hazard to deal with.
Pictures: Lunch break on top of Sarkofagen.
We descended on the other side towards the Longyearbreen glacier through lateral moraine terrain. Moraines are the “leftovers” of moving glaciers which consist of – usually completely loose – soil and rocks. Especially this moraine side looked and felt like walking on the moon, and we learned that at some point, the university was involved in astronaut training taking place here! It takes all your concentration to walk on as stunning as this terrain looks.
Pictures: Descending to Longyearbreen glacier.

Not only because of the loose ground but also because of ice hidden underneath soil and rocks. Some frost is still connected to the glacier; other ice is formed by rainwater and meltwater. These moraines (on top of the ice) are called supraglacial moraines, and it takes some practice to distinguish them from the safer walk-on areas.
Pictures: Hiking across moraines.

Having found a way down to the side of the Longyearbreen glacier, we put the crampons on, and some of us – including me – stepped onto a glacier for the first time in our life. It was fun! And with the crampons, pretty easy to walk.
Pictures: Stepping on the glacier

We just had some fun and took pictures. Since we all have different backgrounds, people are interested in various things. One classmate studies the bacteria and other tiny creatures (sorry, Lea, I can’t recall the correct terminology) in small water holes that form inside the glacier. One can easily take these living communities for mud/dirt. But when you get closer or even touch them, they look and feel like a brown cottage cheese!
Pictures: Discovering the glacier – and the tiny glacier hole communities of Lea.

Another student, Svenja, showed us a red pole that she and another course placed there earlier in July – and they placed it deep into the ice so that it would only stick out 10 cm. You can see how far it sticks out now. This is how much the glacier just melted since July!
Pictures: Measuring glacier transition: The pole was sticking out only 10 cm in July – this is how fast the glacier melts.

We ended the hike at the bottom of the glacier, the terminal moraine area. There it is possible to find fossils –this is what we all started to look for!
Pictures: Looking for fossils. Can you spot the leaf? Yes, there were trees here a very long time ago.

During the hike, we paused quite a lot and looked at the different patterns of landslides, rockfalls and collapses. We also learn a lot about factors that are crucial for survival in Arctic terrains – such as clothing/layering techniques, technical breaks to adjust clothing quite often and other equipment that can define life or death, especially in situations where you have to stay outside for longer than expected (while, e.g. waiting for rescue – which can take quite long in the Arctic region). We were pretty close to Longyearbyen. For day trips, you should bring personal and group equipment that allows you to survive 12-24 hours outside. Of course, we also learn (and will learn further) about the systems and preparations in the background that ensure safety and quick emergency response.
Well, that’s it for this week. Have you ever been close to/on a glacier, or would you love to experience it? Tell me in the comments!
Stay warm and cozy (we have 2°C and a quite annoying wind).
/ Fabi ❆⇞